
Today I am going to show how easy it is to integrate multiple APIs into your application using XapiX. The XapiX team is bringing new APIs onto the platform all the time, but right now, there are a lot of great APIs around the transport and travel space. Our team also uses Slack for our primary form of communication, so I thought it would be fun to create a custom Slack integration that shows data about a given airport.
After the integration is complete, when members of our team are traveling in or out of an airport, they can quickly get all kinds of useful information about the airport through a quick Slack slash command. I am going to start by adding Uber data, which I will focus on for this article. From there, it will be easy to add additional APIs with Airport data, based on airport names, codes, or simply their latitude and longitudes!
Set up the project
I am going to assume you have experience with Node and Express. You do not need experience creating Slackbots or slack slash commands to successfully complete this tutorial, but I will not be focusing on explaining those concepts. If you want to see more detailed tutorials on slackbots, I recommend this article that walks through creating a slackbot slash command* and this article which walks though creating a bot user.
To start, Git clone the starter project, if you want to follow along with the steps below. If you don't want to follow along, you can download the completed project here. Just remember to update the constants with your XapiX project's API information.
In the terminal:
git clone https://github.com/llomelchenko/xapix-slackbot-starter.git && cd xapix-slackbot-starternpm installTest that your app is working locally.
node index.js
Go to http://localhost:9001. You should see the text "Express App is working".
*I used this article to create my first slash command, and it has helped to inform this post!
Discover, Integrate, and Prepare your APIs in XapiX
If you have custom test data you would like to use, check out our other blog post on uploading it quickly and easily from a CSV file!
Go to Xapix.io and scroll down to the API discovery tool. I am going to select the Lufthansa API for their list of airports and the Uber API for some information about Uber services and time estimates at a given location. I hate when I get to an airport and realize they don't allow UberX or UberPool at that location, so I want that information so I can prepare ahead of time.
API Discovery Tool:
API Provider Page:

I am adding the airports API from Lufthansa and the time_estimates API from Uber to my Workbench.
The airports API will give me a list of airports, in addition to their location by latitude and longitude. I can use this location data to get all sorts of information about that airport.
The time_estimates API will give me a list of Uber services and time estimates for those services based on a given location's latitude and longitude (which we will get from the aiports API).
Enter your API credentials for each of the APIs in the prepare screens. You only have to do this once, and you no longer have to manage your mutliple API keys! Next, enter example parameters, if needed (this will help you test them in the next screens) and finally, see your integrated, single API information on the Integrate screen. Open the console on the right for live testing of your endpoints.
Enter XapiX Info into your project
Enter XapiX info into your index.js file.
const xapix_auth_key = process.env.AUTH_KEY || require('./token.js');
const baseURL = 'https://xap.ix-io.net/api/v1';
const airportBaseURL = baseURL + '/lufthansa/airports/';
const uberBaseURL = baseURL + '/uber/time_estimates';
const xapix_headers = { 'Authorization': xapix_auth_key, 'Accept': 'application/json' };
That's it! No matter how many additional API's you integrate in your project you will not have to track any additional tokens or authentication information in your source code or deployment server. Its all tracked on XapiX - you just need your one XapiX project authentication token.
Add application logic
Add logic to your POST function:
app.post('/post', function(req, res) {
 let airportoptions = {
 url: airportBaseURL + _.toUpper(req.body.text),
 headers: xapix_headers
 };

 rp(airportoptions) //call for airport info
 .then(airportResponse => {
 return uberReq(airportResponse);
 })
 .then(response => {
 var resBody = {
 response_type: "in_channel",
 text: parseUberResp(response)
 };
 return res.send(resBody);
 })
 .catch(err => res.send('Airport not found.'))
});
Write functions to do the legwork!
function uberReq(airportResp) {
 const airportdata = JSON.parse(airportResp);
 let options = {
 url: uberBaseURL,
 headers: xapix_headers,
 qs: {
 'filter[lat]': airportdata.airport.position_latitude,
 'filter[lon]': airportdata.airport.position_longitude
 }
 };
 return rp(options)
}

function parseUberResp(uberResp) {
 const uberdata = JSON.parse(uberResp);
 if (uberdata.time_estimates) {
 return createUberServicesList(uberdata);
 } else {
 return 'There are no services available at this location.';
 }
}

function createUberServicesList(uberdata) {
 let uberList = "The following uber services are available: ";
 _.forEach(uberdata.time_estimates, product => {
 uberList = uberList + product.display_name + ' (' + getMinutesDisplay(product.estimate) + '), ';
 });
 console.log(_.trimEnd(uberList, ', '))
 return _.trimEnd(uberList, ', ');
}

function getMinutesDisplay(seconds) {
 let minutes = Math.floor(seconds / 60);
 return minutes + ' minutes';
}
Deploy to heroku
Slack doesn't send slash commands to localhost, so we will need to deploy our code somewhere Slack can access it. We are going to use Heroku, since it is easy to get up and running quickly.
If you haven't already, sign up for a Heroku account, install the Heroku toolbelt, and login. In the terminal:
brew install heroku-toolbelt
heroku login
Create the app, deploy it, and open it to check that it is working.
heroku create
git push heroku master
heroku open
In your newly deployed Heroku site, you should see the text "Express App is working".
Next, add the XapiX token to your Heroku config. You can find this token at the top of the "Integrate" screen in XapiX.
heroku config:add AUTH_KEY=[your XapiX token]You can check the Heroku dashboard to confirm the token was added successfully.
Setup slash command settings in slack
Go to your Slack team's "Custom Integrations" page and add a slash command. I have included my slash command settings as an example below:
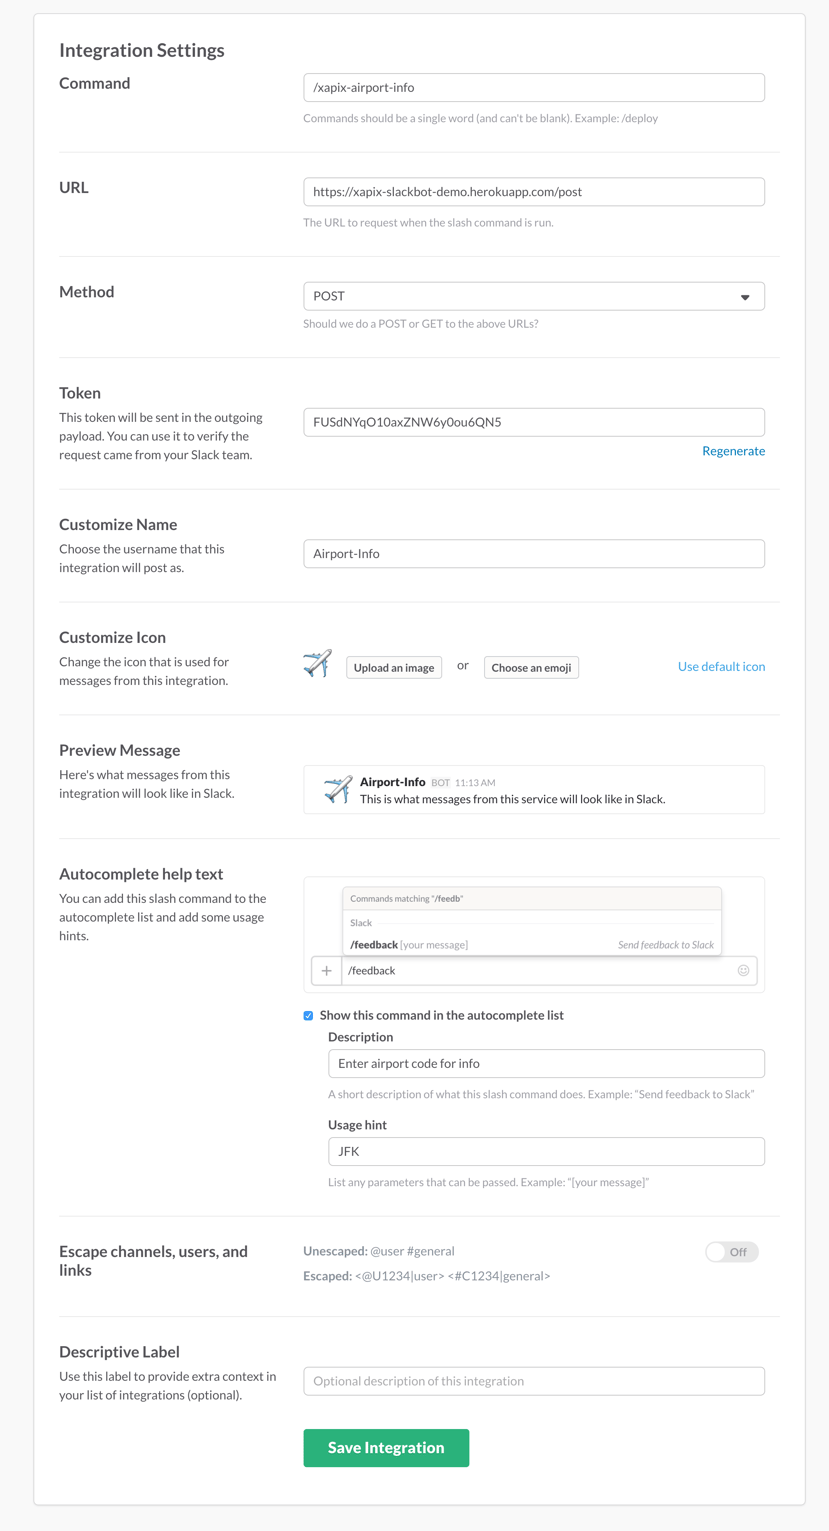
Save your integration, refresh Slack (CMD+R), and try out your new integration!

Continue to integrate APIs!
Now that you have added Uber data to your airport-info slash command, you can see how easy it will be to keep adding data about airports. Next, I think I will add weather data or even security checkpoint waiting times.